 So, you have everything planned for your wedding day. The bridesmaids have their altered dresses, you’ve finalized your contracts with your vendors, and you’re making your final wedding check list. What is left to do?
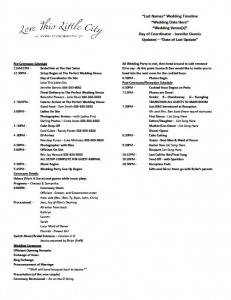
Well, whenever I am doing day-of wedding coordination for a couple, one of the most important things that I do prior to their wedding day is create a timeline. This is a comprehensive, one-pager that is the guide to the who, what, when, and where for their big day.
Once I’ve created the wedding time line and all of the details are ironed out, I’ll distribute copies to the couple, their wedding vendors, and the wedding party. It helps to make sure that everyone is on the same page, and it helps me to do a much better job because I just need to fold up that one piece of paper and stick it in my dress pocket. (I keep all of the detailed wedding documents handy in a folder, but this way I don’t have to carry it with me everywhere.)
Up until a few months ago, I had always written out the wedding timeline by hand while I was at my initial meeting with my couple. Then, duh, I realized it would be so much easier for me to turn it into a form. That would have to be one of the best things I ever did! And, I’m going to share my Wedding Timeline Worksheet with you!
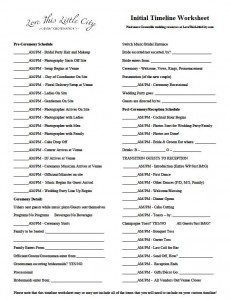
Now, I may not have created one of the fanciest-looking documents, but boy, is it exactly what you need when you are doing the final planning for your wedding day!
Tips for Using My Wedding Timeline Worksheet:
- Click on the image above to be taken to a PDF of the document. Then, download it or print it directly from the browser.
- You can use this worksheet at any point during the planning of your wedding, you’ll just keep adding more details later if you start early on in the process.
- Go through the worksheet and mark off anything that won’t apply to your wedding day. Fill in tentative/set times for the items that are relevant, and circle items where there’s a choice.
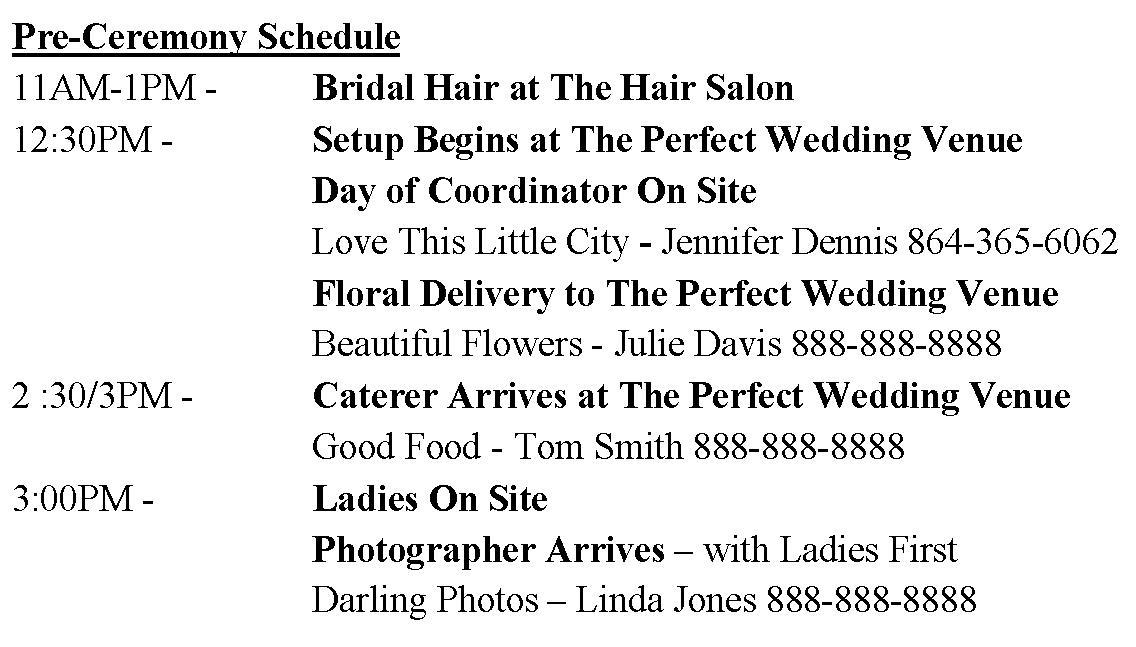
- Once you know what lines you’ll need to include in your timeline, then comes the fun part. 😉 You’re going to need to retype the timeline to reflect what you, your vendors, and your wedding party will need to know. Only include the lines that matter for your wedding.
- After you’ve retyped the information that you needed to carry over, you’re going to continue to add details. For each line that refers to a vendor arrival or drop off, you’re going to add their Company Name, Day-of Contact, and that person’s Day-of Phone Number.
 You’ll also want to include all of the details for your ceremony, including the order for your wedding party and the songs that you’ve picked (then there isn’t any room for misunderstandings or mistakes).
- I also always include the titles of each section of the ceremony. They may or may not be listed in the program for your ceremony, and it will come in hand for any vendor (musician, DJ, wedding director) that is trying to keep track of how much of the ceremony is left.
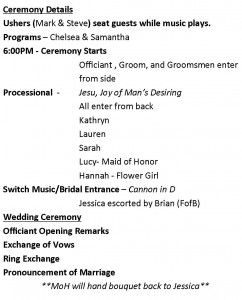 You should also list particular songs for the reception including your first dance, any family dances, the bouquet & garter toss, and the final song (if you want to have a particular one played).
- When wrapping up the timeline I also like to list who the gifts and decor items need to go home with. This also makes sure that everyone has a chance to talk about it ahead of time (and that the trunk is cleared out and that the car won’t be full of people!).
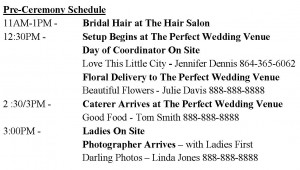
- Once you have all of this done, even though it will take a bit of time, you’ll be able to relax more knowing that the plan for your wedding day has been laid out on paper. When you add everything in, it should look something like this.

Now, a few things to note that I have left off of this timeline that I would normally include:
1) I didn’t list any of the family that would be escorted in (just because this can vary greatly). You’ll start with the groom’s grandparents, then the bride’s grandparents. That will be followed by the groom’s mother and then the bride’s mother. I always list who will be escorting them as well.
2) One thing that I really like to do, if time allows and the couple wants it, is to stash the bride and groom away at some point before their introduction so that they can have a moment to just be together quietly and eat & drink something before going in to the reception. I normally only leave them alone for 10-15 minutes, which doesn’t add much to the timeline, but it makes a huge difference in their stress and happiness level (especially if they are starving or thirsty!). Guests are typically so excited to speak to the new couple that it doesn’t leave much time for them to eat once they get into the reception (even if it’s a seated dinner, just a little snack will help).
Well, there you go, that’s how I create a timeline for my couples! Whether or not you have a coordinator, a wedding timeline is definitely something that you will want to have on hand for whoever will be helping you on your wedding day.
Happy Wedding Planning!